
How to Use Brevo for Email Marketing?
Brevo is a complete email marketing and automation tool in 2026. You can use it to create email campaigns, send SMS and WhatsApp messages to your users. However, using this tool requires some knowledge.
Today, I have explained the complete method for using Brevo for email marketing. I have added all the steps that you need to follow. Read this guide carefully and start using Brevo for your business and clients.
What is Brevo?
Brevo is an online marketing tool that helps businesses connect with their customers. You can use Brevo to send emails, SMS, and WhatsApp messages to your audience. It also helps you manage contacts, automate campaigns, and track results in one place.
Brevo has also won the Best Value for Money badge for the consecutive 3 years (2023-2025). This makes it the best marketing tool with affordable prices.
How to Use Brevo for Email Marketing Campaigns?
Without further ado, let’s learn about how to use Brevo as a beginner or an expert as well. I have shared my 2 years plus knowledge and experience with you in this guide. So here is the complete method about how to use this email marketing tool for your business.
Register Your Brevo Account
Before you start using Brevo, you need to create a Brevo account. If you already have a Brevo account, then proceed to the next steps.
1- Go to Brevo.com Official Website:
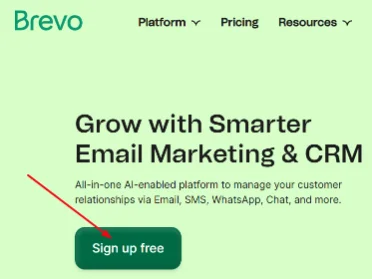
Brevo offers a free plan for all users. You can use this free plan forever, and there is no need to add credit card details for this plan.
However, if you want to get maximum benefits from Brevo, then you should opt for a Business plan. Also, you can send up to 300 emails per day with a free Brevo plan.
On this official website, you will see the “Sign Up Free” button, so click on it. It will take you to the registration page. Here you have two options. You can either go with Gmail or Apple email to sign up directly, or you can proceed with manually entering your email.
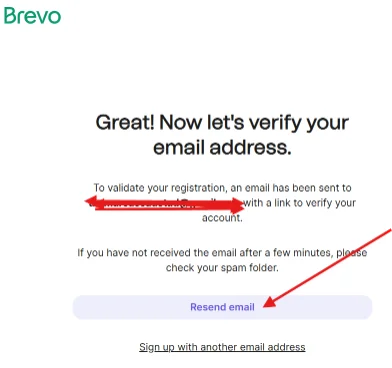
2- Confirm Your Email Address:
Now you need to confirm the email address that you have provided to Brevo. Just open your email account and check for a verification email from Brevo, and open it. Verify the email and follow the next steps.
3- Choose a Brevo Plan for Your Purposes:
After activating your Brevo account, you will be redirected to the Brevo pricing plans page. Here you can check prices for each plan. Also, if you want to start with a free plan, then you can choose the free plan. It is free forever, and there is no need for credit card details.
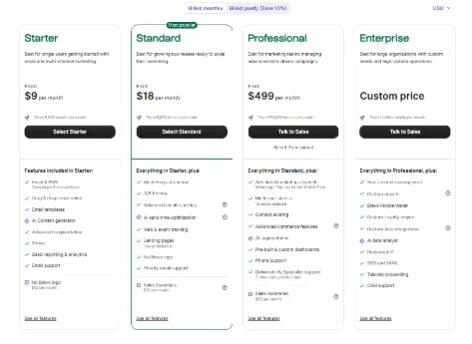
However, to use features like Smart Send Time or A/B testing, you need to upgrade your package to the paid plans. Here are the pricing plans:
- Free ($0/month)
- Starter (From $9/month)
- Business (From $18/month)
- Enterprise (Custom price)
4- Sign In To Your Dashboard:
Now your account is registered, and you can use Brevo for your email marketing or CRM purposes.
Start using your Brevo account and make email campaigns, SMS, and WhatsApp message automations.
Start Using Brevo
Get started with your preferred plan. You need to authenticate your email domain before you start the email automation with Brevo. The authentication process is mentioned below.
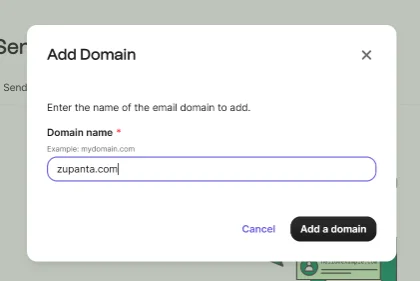
1- Go to Senders, Domains & Dedicated Domains:
Log in to your Brevo account and go to your profile, and then choose the “Senders, Domains & Dedicated Domains” option. This will open a new dialogue where you need to enter:
- From Name
- From Email
Once you have entered the details, you need to click on the “Add Sender” button to continue the process.
2- Verify Your Email Domain:
Brevo will verify your email domain using your domain name service provider, like NameCheap or GoDaddy. This process is automatic. However, if it does not verify your email, then you have to do it manually.
Import and Manage Your Contacts with Your Brevo Account
The next step is to import or manually add your contacts to your Brevo account. This is very necessary because this will allow the Brevo to send emails or SMS to your contacts with automation.
- Log in to your account and go to “Contacts”.
- Now choose “Import Contacts” and go to the next step.
- Here on this step, you can either manually add your contacts or upload a CSV file directly.
- Map your contacts by First Name or Email Address.
- You also need to create a list of contacts whom you want to send emails to.
This will add all of your contacts, and now you can start the email campaign or SMS automation process with Brevo. Let’s find out in the next step how to do it.
Build Your Newsletter Sign-Up Form for Your New Users
You need to grow your list of contacts. This is possible with the email newsletter subscription form. Let’s learn about how to do it.
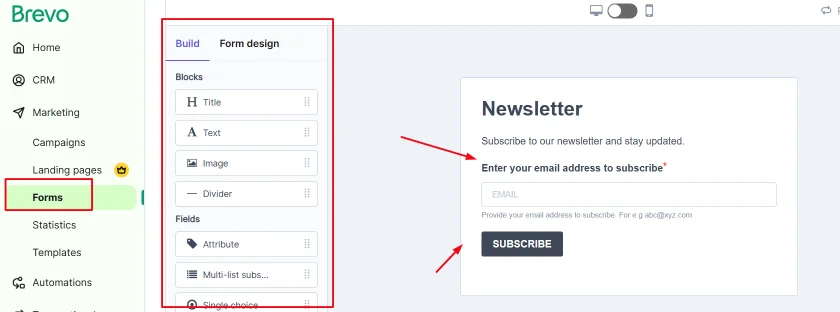
- Sign in to your Brevo account, and then go to Contacts, then Forms, and then Create.
- Give a name to your form, like in this case, “Sign Up Newsletter”.
- Enter the First Name and Email in the required fields.
- Design your template with customization of your fonts, colors, and themes.
- Allow the double opt-in option.
Now your form is ready, and you can use it either on your website or share the direct link with the help of Brevo’s Quick Share feature.
Start Sending Your Emails with Brevo’s Automation
Finally, you are all ready to send your emails to your contacts using Brevo’s automation.
- Open your profile and then go to Campaigns > Create Campaign > Standard Email Campaign.
- Choose a name for your campaign, like “Sign Up Form”.
- Pick a sender name like “Zupanta” and the sender’s email “contact@zupanta.com”. Now choose your recipients where you need to send emails.
- Write an appealing subject line and send the emails.