
Brevo (Sendinblue) Review 2026
Email marketing is a blessing for marketers like me. And when it comes to running my email campaigns, Brevo offers something better. Today, I am writing a detailed review article about my personal experience with Brevo or formerly Sendinblue. I’ve been using this email automation tool for more than two years. It has helped me grow my business and build stronger customer relationships.
After using this tool for over 24 months, I have compiled my reviews, tips, and precautions for marketers who wish to try it. So read this complete tutorial and get to know that you need to.
What is Brevo?

Brevo (formerly Sendinblue) is an email automation tool. It also offers SMS marketing, email marketing, and CRM (Customer Relationship Management). It is a complete digital marketing solution in 2026. Brevo was started in 2012 by Armand Thiberge. At that time, the company name was Sendinblu, and later in 2023, it became Brevo.
Why Choose Brevo in 2026?
In 2026, we have lots of amazing email marketing tools like Klaviyo or Drip. However, Brevo has its own perks. Here are some reasons that make this tool a try at least once for all marketers and content creators.
- Free and Paid Plans: Brevo offers both free and paid plans to its users. You don’t need to pay first to test this tool. You can choose the free trial and send 300 emails per day.
- Ease of Use: You don’t need to be a tech expert to use this tool. Everything from creating an account to setting up your first email campaign is simple and smooth.
- Premium Level Deliverability: No more emails sent to the spam folders. With Brevo’s SMTP, all the emails go straight into the inboxes of your users.
- Smooth Integrations: No hassle or worries about integration. It works smoothly with major builders like Elementor, WooCommerce, WPForms, Ninja Forms, Contact Form 7, OptinMonster, Gravity Forms, and over 40 other platforms.
How to Sign up for Brevo?
Now, let’s find out how to start using the Brevo account. If this is your first time, then this guide is very beneficial for you. I have explained all the details about how to sign up and start your first campaign. Here we go!
Note: You need to have an email domain to use Brevo without any issues. Other email addresses like @gmail.com, @hotmail.com, or @yahoo.com are not recommended for use with the Brevo account.
1) Create Your Brevo Account and Get Started for the First Time
You need to create your Brevo account if you don’t have one. Visitors who have already registered with Brevo can proceed to step 2.
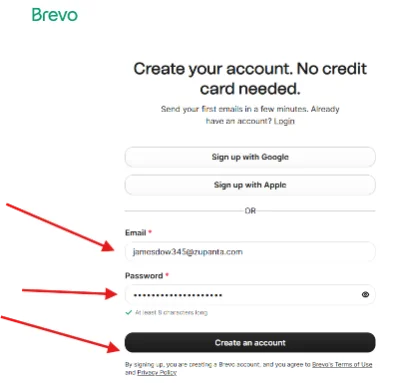
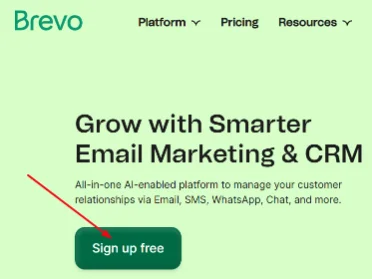
Go to Brevo.com and click on the “Sign Up Free” button located at the upper right corner. On the next page, you can choose the option “Sign Up with Google” or “Sign Up with Apple”. However, you should proceed with the email address. Just enter your email address and choose a strong password, and click on the “Create an Account” button.
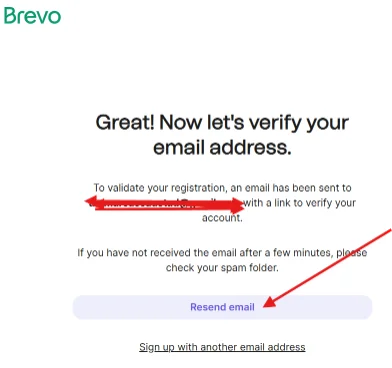
After that, you will need to confirm your email, so go to your email inbox and confirm your email.
2) Fill Out the Signup Form
Start the registration process by filling out your registration form. Here are the details that you need to enter:
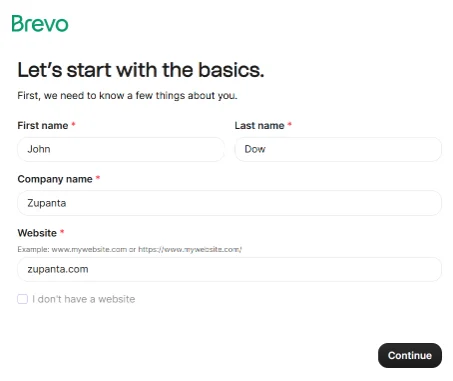
- Full name
- Company name
- Website
Now, click on the “Next” button to fill out more details that include:
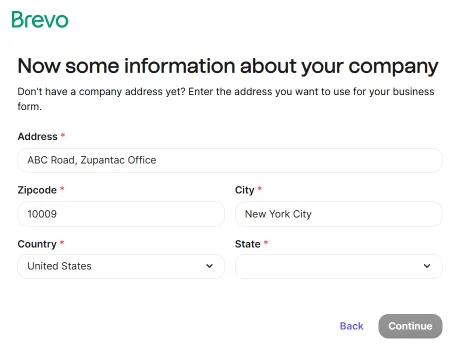
- Address
- Zip code
- City
- Country
You need to click on the “Next” button again and then tell about your business details:
- How many people are in your team?
- How many contacts do you have?
- Do you sell online?
- Yes
- No
Proceed to the next page, and here you are required to enter your phone number.
3) Choose Your Plan
Now you need to choose a pricing plan for your account. You can start with the free plan or select a paid one that suits your needs.
Paid plans are:
- Strater ($25)
- Business ($65)
- Brevo+ ($1000)
Once you’ve chosen your plan, you’ll see a checklist that gives you a quick guide on how to use Brevo for the first time.
On the homepage, you will see a left-hand menu with the following key options:
- Contacts: This section lets you manage and set up your forms, landing pages, subscriber details, and other essential settings.
- Campaigns: Here, you can create and send emails like newsletters and updates to your users.
- Automations: Build workflows that send automated messages like welcome series emails or cart recovery reminders. Each workflow runs based on user actions, helping you stay connected and increase engagement without manual effort.
- Transactional: Set up emails that send automatically when users take specific actions, such as dumping a cart or completing an order.
- Conversations: Manage live chat, CRM, and other things.
- Deals: Make deals for users.
- Meetings: Arranging meetings or scheduling them.
Verifying Your Email Domain with Brevo
This step is very important. It helps you authenticate your email domain and improve deliverability, so your emails don’t end up in spam folders. Follow these steps for the automation of your email.
Go to your “Settings” section and then choose “Senders, Domains & Dedicated IPs” in the section below.

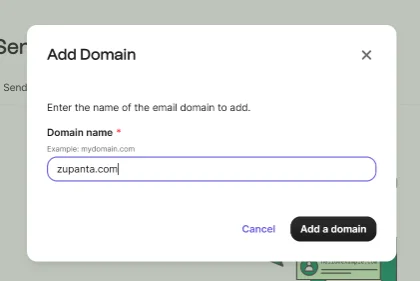
On the new page, you will see a dialogue with 3 menu bars. Choose ‘Domains” and then click on the “Add a Domain” button.
A new pop-up will appear on your screen where you will be asked to enter your email domain. Once done, you can click on the “Add a Domain” button to proceed.
Authenticate Your Domain
You will see three options to verify your domain. You can choose any one of the following methods:
- Authenticate the Domain Automatically
- Authenticate the Domain Yourself
- Ask Someone Else to Authenticate the Domain for You
Note: Automatic authentication may not be available for all users. It depends on the hosting service you use for your domain.
So I’m selecting the second option, “Authenticate the domain yourself.” Here are the steps to complete this process:
Add DNS Records for Brevo Account Authorization
Brevo takes security very seriously. For the safety of both website owners and visitors, Brevo needs to verify your domain using the DNS records method. If you are not sure how to add DNS records for Brevo account authorization, then here is a simple guide.
First of all, you need to log in to your domain service provider, like GoDaddy, NameCheap, or Hostinger. Now look for the DNS settings and open it.
Note: If you’re not familiar with DNS settings, ask your domain service provider for assistance. They can add the records for you quickly and correctly. Elsewhere, you can read this tutorial about how to add DNS records for your domain.
Once you are on the DNS records page, you will see the option to add or delete DNS records. Here, you need two TXT records.
Here’s what you need to add:
- TXT Record (Brevo Code): This record verifies that you own the domain linked to your Brevo account.
- TXT (DKIM) Record: This record adds a digital signature to your emails. It helps email providers confirm that your messages are real and not changed during delivery.
- TXT (Optional DMARC Record for Google and Yahoo Users): This record adds extra protection and improves trust with email providers like Google and Yahoo. It helps prevent your emails from being marked as spam.
After adding these records to your DNS settings, return to your Brevo account and click ‘Verify’. The process may take some time to update, depending on your hosting service.
Importing Your Contacts
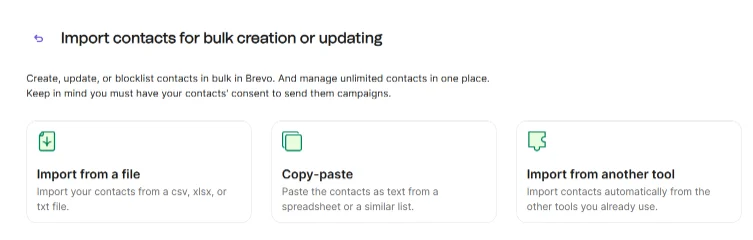
Now it’s time to import your contacts to the Brevo account. This will help you to send emails and SMS to your targeted contacts.
- Go to your Brevo account dashboard and look for “Contacts.” It is right below the “Home” section.
- Here you will see four options with the text “Import your data to Brevo”.
- Contacts
- Companies
- Deals
- Notes
- Choose “Contacts” and then copy/paste your contacts, or you can upload a CSV file as well.
- Manage your contact attributes, such as email, First Name, etc.
- You can also create a list and assign your contacts to it.
You can also add contact attributes of your own choice, like “Company” or “Region”. Go to Contact Settings > Attributes, and then you can personalize emails and segment your audience more effectively later.
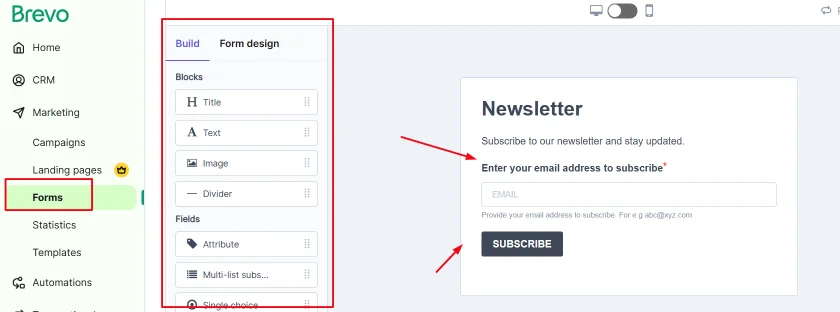
Create Your Signup Form
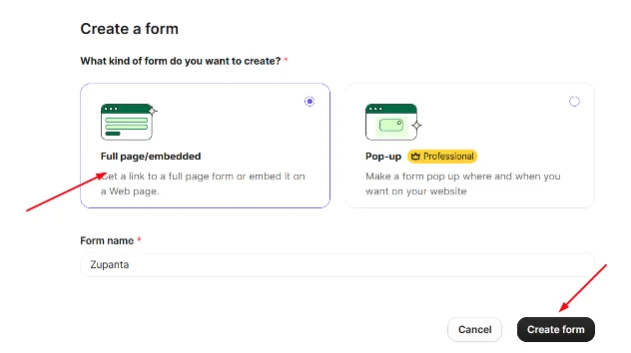
Creating a Signup form is a very important task. It will help you collect the emails of your users.
- Go to Contacts > Forms > Create and choose a name for your form, like “Newsletter”.
- Add the field that you need to collect from users, like First Name, Last Name, and Email Address.
- You can also customize the form fonts with your blog or company’s color theme.
- Enable the double opt-in option. This is very important for the deliverability of your campaigns.
Set up and Send Your First Campaign
Now you can send your first email campaign. You need to design your email and then send a test email to check the deliverability and other features.
Start a Campaign
Go to Campaigns > Create Campaign > and then “Standard Email Campaign”.
Name the Campaign
Name your campaign like “Test Email”.
Set the Email
Now you can set the email, sender name, and a recipient to send your test email.
Write a Compelling Subject
Write a subject line that attracts your users and proceed to designing your email.
Design Your Email
Brevo has a drag-and-drop editor for the customization and designing of email templates. You can choose pre-made templates or make your own.
On the left side of the editor, you can add text, headings, and images to your email template. You can also insert a call-to-action button and style it to match your design or goals.
Send a Test Email
Now send a test email to make sure everything works properly. Always test your email before sending it to users to check for any errors or display issues.
Start Your Email Marketing Campaign
Finally, you can start sending your email marketing campaigns to your targeted subscribers. You can send all the emails at once or schedule them for later.
Create a Welcome Series Automation Email
Let’s learn about the features of Brevo that make it best for me. You can set and send welcome series emails with ease. All you need is:
- Go to Automations and then choose the “Create an Automation” option.
- You need to pick a Welcome Message template before you start creating your automation email.
- Now choose a list for this that you have created before, like we created “Newsletter Sign Up”.
- You also need to choose if the user can re-enter the workflow.
- Now you can send emails immediately or schedule them for later sending.
Customization of Welcome Email
Once you have prepared the complete email, you can customize your welcome email. Follow me:
- You have two options for customization. One is the default option available in Brevo, and the second one is a saved template.
- Write a strong, appealing, and catchy welcome email subject line like “Welcome To Zupanta, Get Marketing Tips That Are Working in 2026”.
- Counter-verify the sender email and address before you launch the campaign.
- You need to add a time delay to make a series. You can add a time delay, like 1 or 2 days, as per your need.
- You can get great results from a welcome email series if you offer free or discounted deals to first-time buyers or want to share your brand story with new users.
Tracking of Your Results with Brevo
The final step is to check whether your Brevo email marketing is working properly or not. For this purpose, you need to track your progress.
- Go to your Workflow and then the “See Stats” option.
- You can check all the stats of your running campaigns in this section.
- Also, you can check the stats from Campaigns and then the Statistics section.
Set SMS Marketing Campaigns with Brevo
Besides emails, you can use Brevo to send SMS as well. My testing with SMS campaigns is very satisfying. Here are the steps to take.
- First of all, you need to add or upload phone numbers to your Brevo account.
- Now you are required to personalize your SMS messages using contact attributes. You need to use your content attributes with a bracket {}. Just add your attribute inside { } brackets, like {FULLNAME}.
- Send SMS to your desired contacts.
Set Campaigns for WhatsApp and Facebook Ads – Social Media Marketing With Brevo
Planning to set up your social media, SMS, or ad campaign? Brevo has a better solution for you. With its easy-to-use interface and all-in-one platform, Brevo gives you everything you need to grow your business.
- Open your Facebook account and connect with Brevo.
- Once you connect your Facebook account, you can manage all of your Ads with Brevo. However, you need to subscribe to a business plan for this feature.
- Create your complete campaign, like targeting users, setting a budget, scheduling your ads, or designing your ads with Brevo’s easy drag-and-drop editor.
Brevo Features
Now let’s have a look at the best features of Brevo. These are the features that I have tested, used, and am still using in 2026. So get more from Brevo with these features.
1. Brand Library
This is one of the best features that I love. Now you can keep your brand assets in one place. You can store logos, colors, and templates. It is a great way to stay focused on your company.
2. Easy Drag-and-Drop Editor
Brevo offers a simple drag-and-drop editor. You can design emails, landing pages, or SMS without coding. Add text, images, and buttons easily.
3. Automation Builder
The Automation Builder helps you create smart workflows. You can send emails or messages based on user actions. Set rules once and let Brevo handle the rest. It saves time and keeps your audience engaged automatically.
4. Brevo CRM
Another feature that makes Brevo my go-to option when looking for sales monitoring. Brevo lets you manage your leads and customers. Simply add your contact attributes and track the deals, and follow up on the details. And it is all free.
5. Brevo SMTP
SMTP stands for Simple Mail Transfer Protocol. Brevo SMTP lets you send automatic emails such as order confirmations, password resets, or notifications. With this feature, your emails won’t end up in the spam folders of recipients.
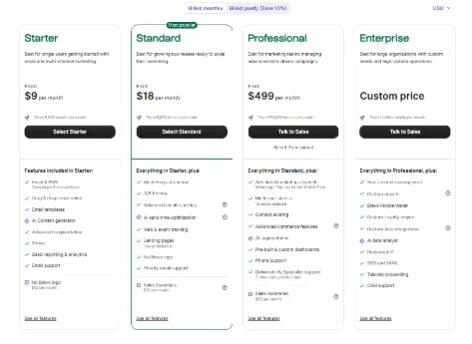
Brevo Pricing – Which Plan is Best for You!
Brevo offers 4 types of plans for its customers. If you are a newbie, you can go with a free plan that does not require any credit or debit card details. However, for professional and more feature-oriented use, you can go with premium or paid plans.
Let’s find out what these plans are offering and who should buy them.
Free – For Newbies or Testing Brevo
| Feature | Details |
|---|---|
| Pricing | $0/m |
| Template Editing | Customize email templates |
| Daily Emails | Send 300 emails per day |
| Transactional Email | Yes |
| Email Editor | Drag and drop editor |
| SMS & WhatsApp | Yes |
Starter – Best for Established and Growing Businesses
| Feature | Details |
|---|---|
| Plan Name | Starter – Best for Established and Growing Businesses |
| Pricing | From $9/m |
| Includes Free Features | Everything in Free plan |
| Analytics & Reports | Reporting and analytics tools |
| Sending Limit | No daily email sending limit |
| Branding | No Brevo logo (+$12/month) |
| Support | Email support |
| Templates | Customizable templates |
Business – Best for Marketing Managers and E-commerce Experts
| Feature | Details |
|---|---|
| Plan Name | Business – Best for Marketing Managers and E-commerce Experts |
| Pricing | From $18/m |
| Includes Starter Features | Everything in Starter plan |
| A/B Testing | Yes |
| Automation | Marketing automation |
| Smart Send | Send time optimization |
| Analytics | Advanced reporting and analytics tools |
| Support | Phone support |
| User Access | Multi-user access |
Enterprise – Best for Businesses That Need Custom Solutions
| Feature | Details |
|---|---|
| Plan Name | Enterprise – Best for Businesses That Need Custom Solutions |
| Pricing | Custom price |
| Contacts | Unlimited contacts |
| Contract | Flexible contract |
| Account Control | Sub-account management |
| Integrations | Advanced integrations |
| Onboarding | Tailored onboarding |
| Security | Enterprise-level security |
| Support | Personalized support |
So these are the plans with their features. Now you can pick yours and start using this amazing CRM and marketing tool for your business.
Brevo Pros and Cons – My Personal Testing and Experience Results
I have tested and used Brevo for more than 2 years, and here are the pros and cons that I have found.
Pros:
- I really like the forever free plan. This is what initially attracted me to the Brevo.
- The drag-and-drop editor is a time-saver and blessing for me. It helped me a lot to design hundreds of emails and automation workflows.
- The integration or compatibility level is a thumbs up from me. You can use it with major platforms like WordPress, Facebook, and WhatsApp without any hassle.
- A/B testing helps improve emails, automation, and landing pages through real results.
- Thumbs up for multi-channel campaigns.
- The CRM system helps me track leads and handle customer connections effectively.
- The automation builder saves time by running campaigns based on customer actions.
Cons:
- Bigger businesses need to upgrade to a paid plan.
- Some useful features, like A/B testing and social media marketing, are only available in the Business plan.
- The pricing feels a bit high compared to some other tools.
Brevo Error Message and Fixing
While using Brevo, you may experience some error messages, like an issue with embedding on a site, website tracking, or waiting for the results. So here are the quick fixes for you.
1. Unable to Embed with WordPress Site
Issue: The Brevo form does not appear after adding the embed code to your WordPress page.
Fix: Check if your site uses a block editor. Add the code using a “Custom HTML” block and clear your site cache.
2. Website Tracking Not Working
Issue: The site tracking script does not collect user activity data.
Fix: Verify that the tracking script is placed before the closing </head> tag. Also, confirm that tracking is enabled in your Brevo settings.
3. Results Delayed
Issue: Email or SMS campaign results take a long time to appear on the dashboard.
Fix: Wait a few minutes and refresh the analytics page. If the issue continues, clear cookies or use another browser.
What is a Brevo API Key?
Brevo API key is a code that helps you to integrate your website, app, or tool with Brevo. It allows your system to send and receive data from Brevo safely. For example, if you are using Brevo with WordPress, then you have to download the Brevo WordPress plugin.
The plugin uses the Brevo API key to make a connection between your site and Brevo’s database. With this API key, you can get website tracking details and other stuff.
Download Brevo App
Brevo also offers a mobile app for smartphone users. Both iOS and Android users can install it easily. The app gives quick access to your automations, campaigns, and contacts.
You can manage your marketing tasks anytime, anywhere. Download the Brevo app from the Google Play Store or Apple App Store to stay connected and in control of your campaigns.
My Brevo Reviews – Conclusion
I hope this guide and review will serve your every intent about the Brevo tool. My rating is 7/10 for this marketing tool with my personal experience. I have achieved strong business growth for my clients using Brevo. However, there are some concerns as well.
I suggest you start with the free plan if you are new to marketing or trying Brevo for the first time. It gives you enough features to learn and explore. If you work with bigger clients or handle large campaigns, choose the Business plan for more tools and flexibility.
If you want to discuss Brevo, then my comment section is always open. Feel free to share your thoughts, ask questions, and learn more about Brevo. Have a good day and stay blessed!