How to create an Automation Workflow with MailerLite?
Ready to explore the automation workflow of MailerLite? This step-by-step guide will enable you to set up your first automation without any hassle or issues.
Creating an automation workflow in MailerLite is easy and fun. You can set it up in a few minutes and save hours of manual work later. You build a workflow once, and MailerLite sends emails for you based on your rules.
It feels like hiring a tiny digital assistant who never sleeps or asks for a raise. This guide will show you each step in a simple way. You will learn how to plan your flow, set your triggers, add emails, and keep everything running smoothly.
What is an Automation Workflow?
An automation workflow is a set of steps that start when a user takes a specific action. It can also start on a date or event.
For example, a visitor comes to your website and wants your weekly or monthly newsletter. The visitor clicks the subscribe button and enters an email. MailerLite sees this action and sends a welcome email right away. You do not press any button.
The system does the work for you. This helps you save time and stay connected with your audience without manual effort.
How to create an Automation Workflow with MailerLite?
You can create automation workflows with MailerLite with simple steps. Let’s find out the complete process with a step-by-step guide.
1) Go to Automations Tab:
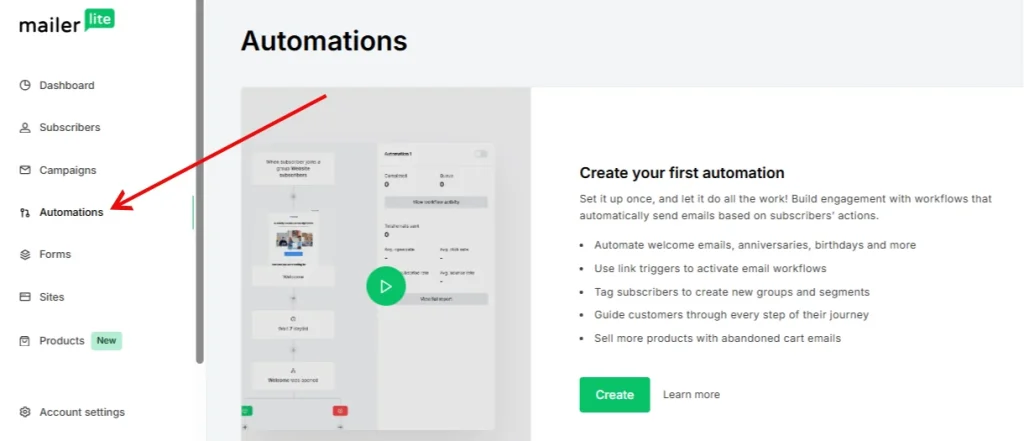
First step is to navigate to the Automations tab located on the left side menu of the MailerLite dashboard. Click on this and then choose “Create workflow”. Now you will see a workflow editor where you can pick the automation creation options, like build from scratch or use pre-built options.
2) Go to Triggers Tab:
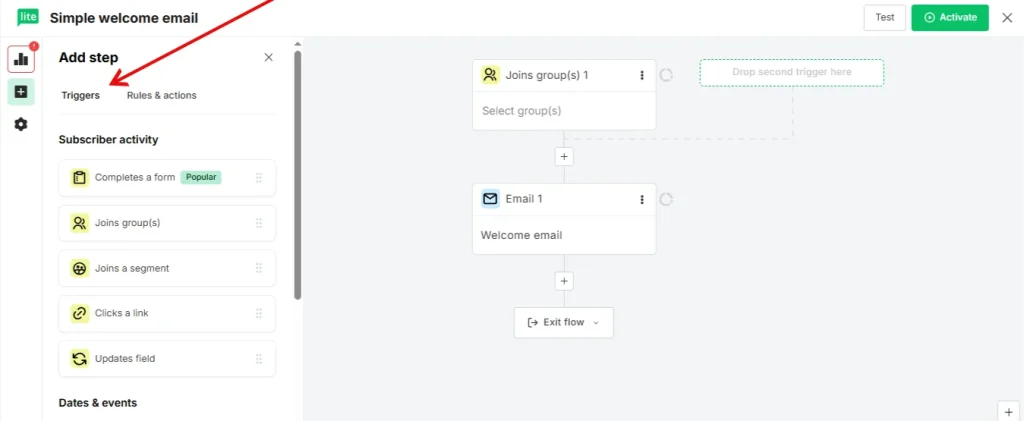
Click the Triggers tab on the left side of your screen. Drag a trigger into your workflow. This trigger will start your sequence automatically. For example, you can start the workflow when someone signs up for your newsletter. This step tells MailerLite when to begin the automation.
3) Set Rules and Actions:
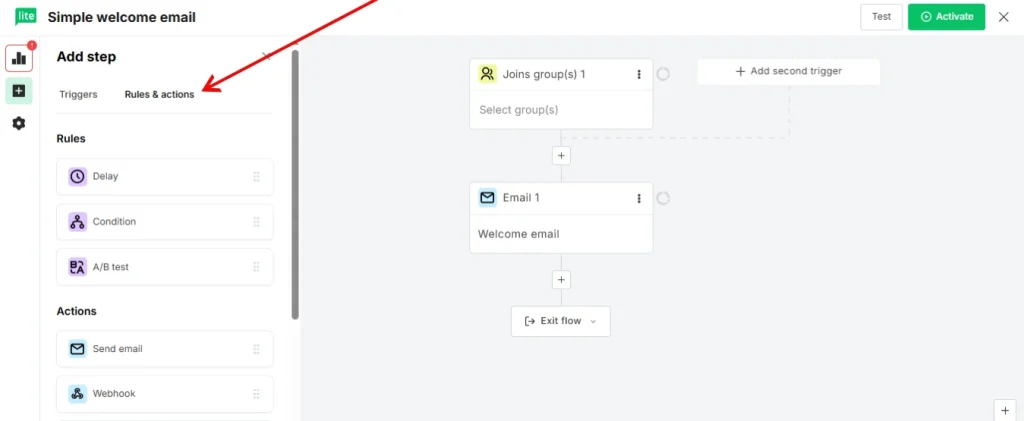
Now you need to set rules and actions for your workflow. Here are some examples of rules.
Rules:
- Delay: You can set the rule to pause your subscriber at a specific step and for a specific set of time before they perform any new task or proceed to the next step.
- Condition: Split subscribers into different paths based on conditions like custom fields, group tags, or past email actions.
- A/B Testing: Divide your subscribers into two groups and then test workflows, and then track the results.
Actions:
- Send Emails: Start sending automated emails to your users.
- Send Notifications to Your Team: You can also send internal notifications to your team when a subscriber performs a specific task.
- Webhook: Share the subscriber’s data with other apps and services.
- Update Custom Fields: You can set the value for each subscriber field.
- Move to Step: Send a subscriber to another workflow.
- Move to Groups: Change the group of subscribers.
- Copy to Groups: Adding one group’s subscribers to another while keeping them in the old group as well.
- Unsubscribe: When a user clicks on the unsubscribe, then remove it from the subscriber’s list.
4) Create Workflow Automation:
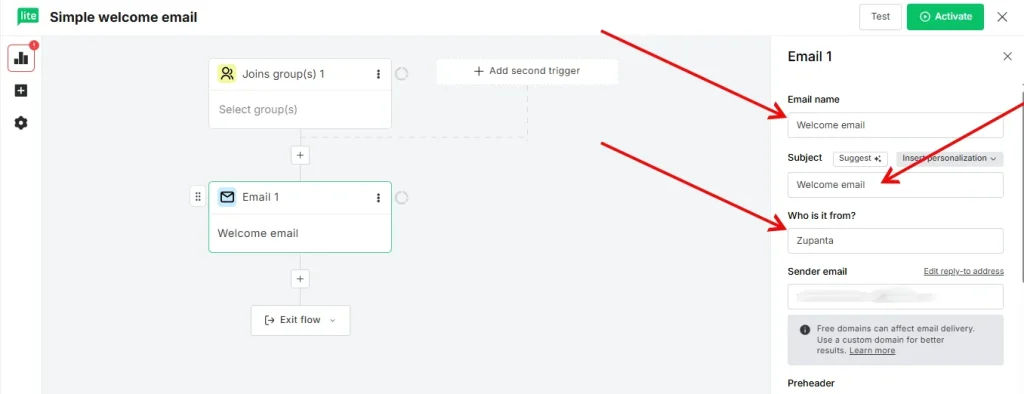
Now you can drag and drop these actions and rules in the workflow editor. For example, let’s pick the option of “Send Email Action”.
Now enter the details in the right sidebar that are:
- Email subject line
- Sender name
- Sender’s email address
Now choose a design for your newsletter. You can create your own from scratch or use the pre-designed templates from MailerLite’s gallery.
Once you are done with designing, you need to click on the “Activate” button to start your automation. So this will be your simple workflow where a user enters the email and joins a group.
Why a Good Automation Workflow Matters in MailerLite
A good automation workflow helps you run your email marketing on autopilot. It saves your time and keeps your audience engaged even when you sleep. Many businesses send emails manually and waste long hours every week. MailerLite fixes this problem with simple tools that handle your routine tasks without stress. You create a workflow once, and it keeps working for you every day.
A strong workflow also helps you send the right message at the right time. When a new user joins your list, you can send a welcome email instantly. Also, When someone clicks a link, you can follow up with more helpful content. When a user becomes inactive, you can send a quick reminder. These small actions keep your subscribers active and interested.
Another big benefit is consistency. Humans forget things. Automations do not. They send emails on time, follow your rules, and keep your communication clean. You can add delays, conditions, and actions to control every part of the flow. This helps you create a personal experience for your subscribers without extra work.